Developer Notes (valid for version 1.0.2)
In Getting Started: As a Poweruser, we created a virtual environment from scratch that can be shared with other users. Here, we show how you can completely specify your own environment. Knowledge of Ansible is needed, which can be gleaned from their excellent documentation at http://docs.ansible.com/ansible/.
Overview: The Build and Run Processes
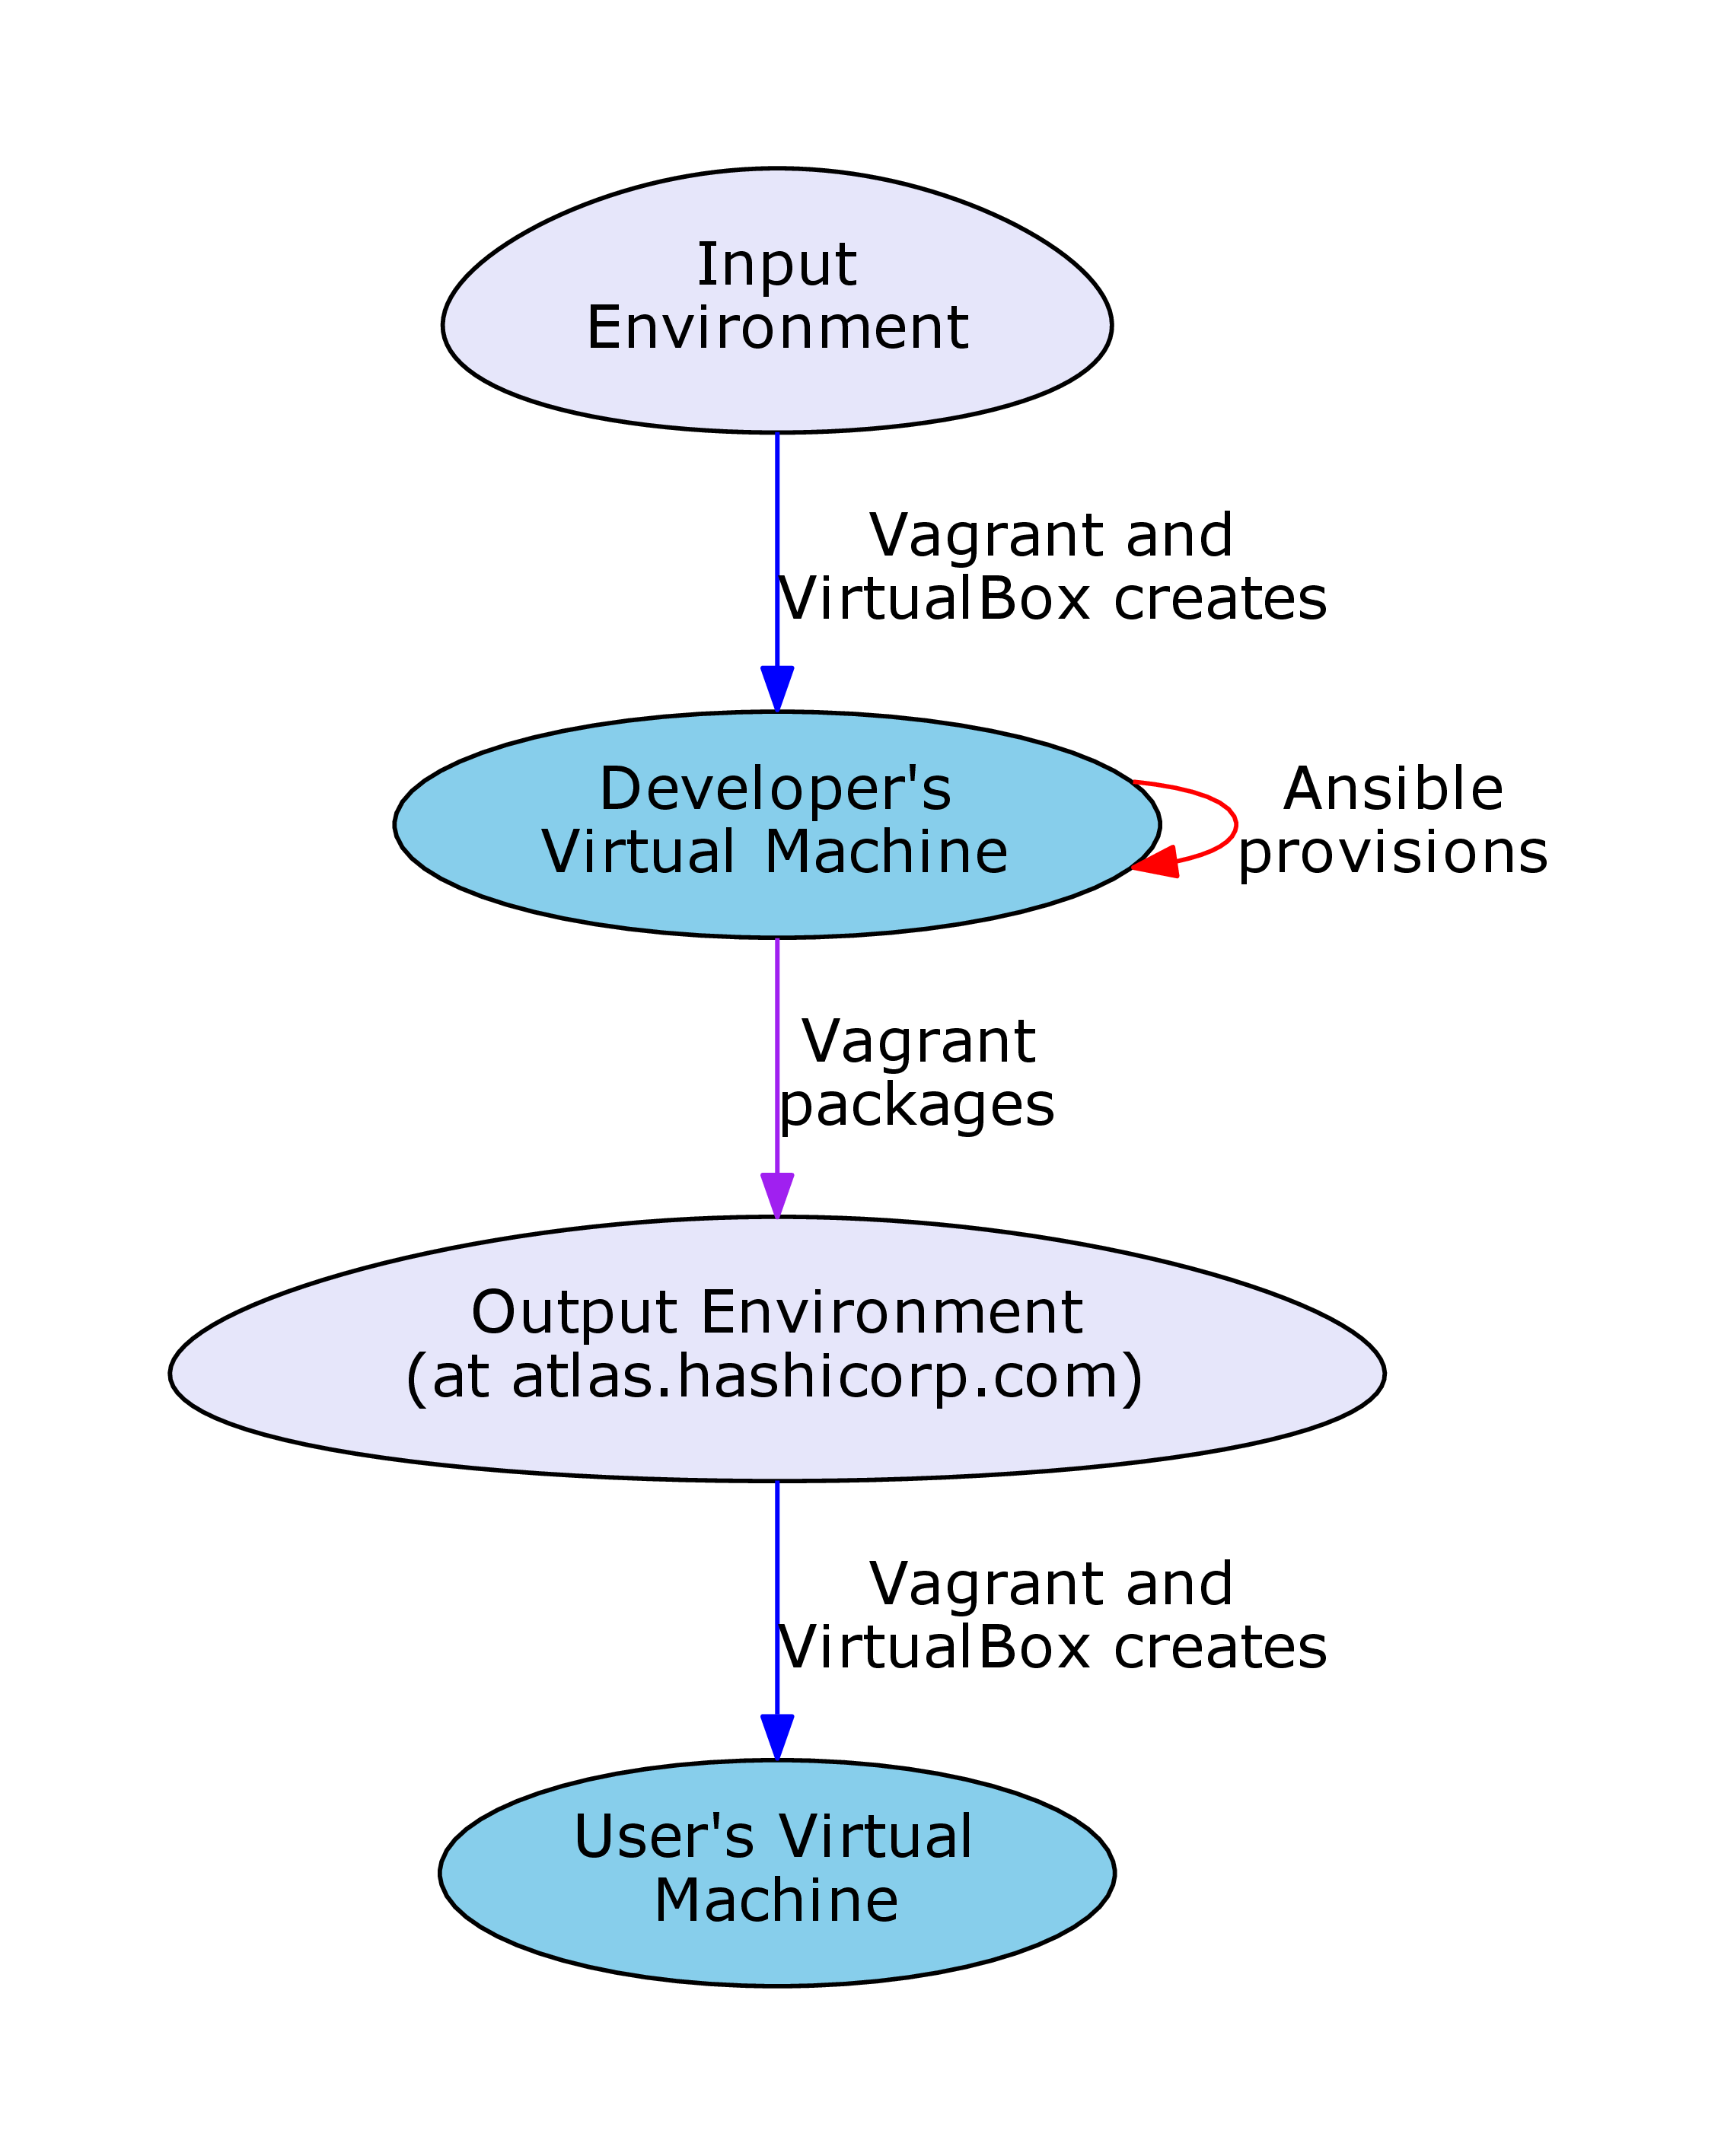
This graph shows the operations involved in the build and run processes.
Lets break this down:
- Input Environment -> Developer’s Virtual Machine: The input environment is a
virtual environment containing only the operating system and few
convenience tools. In development, Vagrant and VirtualBox create a
virtual machine from this environment in the
create_vmrole (see The Build Process). - Ansible Provisions: Vagrant commands Ansible to provision this machine using an Ansible playbook.
- Developer’s Virtual Machine -> Output Environment: Vagrant then packages the virtual machine into a new virtual environment, which can be distributed to others. Tagged releases are uploaded by administrators to atlas.hashicorp.com, where they become available to all Vagrant users.
- Output Environment -> User’s Virtual Machine: The previous steps are run in the build phase by a developer as the build process. This step represents the user following the instructions in Getting Started: As a User to create a virtual machine for themselves, which is referred to as the run process.
The run process performed by the user has been documented in Getting Started: As a User. Here we introduce the build process, which represents the other section of this diagram.
The Build Process
The build (make) process in step 3 in Getting Started: As a Poweruser allowed
us to create a virtual environment. The Makefile in the software repository can
build multiple targets. Each target runs Ansible on the master.yml
playbook, which in turn runs the create_vm role in the roles
directory. This creates a virtual machine and provisions it with the playbook
passed as a command-line argument in Makefile, which lives in the jobs
directory. It will also do some post-provisioning tasks using the hookbook,
again passed as a command-line argument. The fundamental difference between the
playbook and the hookbook is that the playbook is run on the guest virtual
machine by vagrant, and the hookbook is run on the host machine. Different
Makefile targets may place different build artefacts in the artefacts
directory.
Roles add or configure software, playbooks describe the roles that must be enacted to provision the machine, hookbooks describe what to do with that machine (like creating a box file), and jobs are Makefile targets that produce certain machines.
To add a new environment, one needs to add a job that follows the pattern of existing jobs.
Where Things Are
In order to add jobs, one should edit Makefile. In order to do that, one
would need to know where things are, hence the purpose of this section. The
virtual micromagnetics repository is structured as follows:
Makefile: This is the Makefile through which all jobs are conducted.ansible.cfgandinventory.txt: These files are used by Ansible when the master.yml playbook is run. They contain configuration information.roles/: This directory contains roles (obviously). Each role is given a subdirectory, and should not overlap. Each role directory contains tasks, and may also contain the subdirectories:
vars/(variable definitions),templates/(files to duplicate to the guest virtual machine),meta/(metadata, such as role dependencies),files/(files used by tasks that aren’t covered by the usecases of templates)jobs/: This directory contains playbooks and directories that can be thought of as jobs inMakefile. They are either provisioning playbooks, or post-provisioning hookbooks.machines/: This directory is created byMakefile, and houses the vagrant environment for each individual virtual machine. The provision process is recorded to a log file in the machine’s directory (for example, the provision log for the lite build job exists in machines/virtualmicromagnetics-lite/virtualmicromagnetics-lite.log)artefacts/: This directory is created byMakefile, and houses build artefacts.
Examples
Create New Machine with Existing Software
Lets create a custom machine called doc-example, that contains Fidimag but no X
server. Firstly, we add a target to Makefile (append the following to the Makefile):
# This target builds a virtual hard disk file containing an OOMMF and Fidimag
# installation.
doc-example:
    ansible-playbook master.yml -c local -i localhost, -v -k --extra-vars="vm_name=virtualmicromagnetics-doc-example playbook=provision_virtualmicromagnetics_doc-example.yml hookbook=hook.yml extra_resources_dir=guest_resources/"
Now we need to describe what the state of the machine should be, by writing the playbook jobs/provision_virtualmicromagnetics_doc-examples.yml:
---
# This Ansible playbook is a provision playbook designed to be used with
# vagrant. This playbook provisions a machine suitable for micromagnetic
# simulation with Fidimag. It is executed by the virtual machine.

- hosts: all

  vars:
    vm_name: virtualmicromagnetics-doc-example

  roles:
    - fidimag
    - fidimag_examples
    - add_super_user
    - { role: set_hostname, HOSTNAME: {{ vm_name }} }
Now we are ready to build the environment by commanding (again, from the repository root directory):
make doc-example
This creates another virtual environment in the artefacts directory.
Adding Software
In The Build Process, we introduce roles. Roles can add new software to a virtual environment. By way of example, we can create a role to install Emacs (https://www.gnu.org/software/emacs/) from the Ubuntu software repository. We firstly create a directory structure:
# Create a role for Emacs.
mkdir --parents roles/emacs/tasks
Now we introduce some content using information from the Ansible documentation
(http://docs.ansible.com/ansible/, and
http://docs.ansible.com/ansible/apt_module.html). Write the following to
roles/emacs/tasks/main.yml:
---
# This Ansible playbook installs Emacs.

- name: Install Emacs.
  apt:
    pkg=emacs
    state=latest
    update_cache=yes
    cache_valid_time=86400
  sudo: yes
This role, when run, will ensure that the latest version of Emacs and its dependencies are installed on the virtual machine, and updates the apt cache. Roles can be parameterised and have dependencies, which can cause them to become complicated. By way of example, installing Emacs on the new doc-example environment requires us to append the line:
- emacs
To clarify, playbook jobs/provision_virtualmicromagnetics_doc-examples.yml
now looks like:
---
# This Ansible playbook is a provision playbook designed to be used with
# vagrant. This playbook provisions a machine suitable for micromagnetic
# simulation with fidimag. It is executed by the virtual machine.

- hosts: all

  vars:
    vm_name: virtualmicromagnetics-doc-example

  roles:
    - fidimag
    - fidimag_examples
    - add_super_user
    - { role: set_hostname, HOSTNAME: {{ vm_name }} }
    - emacs
Further Tinkering
We have explored how a new virtual environment can be created, and how
new software can be added. In this section, we describe how the virtual machine
itself can be configured using Vagrant’s parameters. Vagrantfiles are files
used by Vagrant written using Ruby syntax. These files specify parameters of
the virtual machine created from a virtual environment. When running
the commands in Getting Started: As a User, we create a Vagrantfile in the
working directory that describes the virtual machine to Vagrant. Vagrantfiles
can also be built into a virtual environment. Built-in Vagrantfiles can be
found in guest_resources/vagrantfiles.
For example, if you wish to specify that 2048MB of memory must be used in the
virtual machine created in Create New Machine with Existing Software [1], we can add a builtin
Vagrantfile at
guest_resources/vagrantfiles/Vagrantfile_virtualmicromagnetics-doc-example_builtin
with the following content:
VAGRANTFILE_API_VERSION = "2"

Vagrant.configure(VAGRANTFILE_API_VERSION) do |config|

  config.vm.provider :virtualbox do |vb|
    vb.memory = 2048
  end
This Vagrantfile will be detected by the hookbook and included automatically when the environment is packaged. For more information on Vagrantfiles, see the Vagrant documentation (https://www.vagrantup.com/docs/vagrantfile/).
| [1] | Note that this is not such a good idea if you want to distribute your environment to different users, since they may have a different amount of available memory to you. |
Summary and Final Words
To summarise, virtual environments are created from an empty Ubuntu virtual machine after being provisioned and packaged. This build process allows the user to create a Virtual Micromagnetics virtual machine using Vagrant and VirtualBox. We have also presented how a new environment can be created, how the software of that environment can be controlled, and how the virtual machines can be parameterised.
Thank you for using Virtual Micromagnetics! If you create roles for your favourite software, consider sharing them with the community. You can create a pull request at our GitHub repository at https://github.com/computationalmodelling/virtualmicromagnetics, or contacting Mark at mark[dot]vousden[at]soton[dot]ac[dot]uk.